WebSockets 101
WebSockets implement a full-duplex, bi-directional, TCP-based protocol, denoted by ws(s)://, which enables a persistent connection between the client and the server.
Why are websockets required? #
Back when websockets weren't a thing, HTTP polling was used for a similar purpose. HTTP is basically a uni-directional protocol wherein a client sends a request to the server, the server accepts the request and sends a response. The server can't send a response for which no request has been made by the client. In simple terms, it only responds to what it's asked for.
This type of behavior poses a problem for real-time applications. What if the server needs to send some information to the client but the client doesn't know about it yet? It can't initiate a response without a request.
To overcome these type of situations, a workaround is used, known as polling. The client assumes that there might be something that will be required later in time from the server and sends periodic requests at specific intervals to the server known as poll requests to check if there's something new. If there's nothing new for the server to send, it just responds with an empty response. This approach is known as short polling.
Short Polling
Long polling is a similar approach as short polling except the fact that the server doesn't respond with an empty response on a poll request by the client. Instead, it receives the request, keeps the connection open, and only responds to it when there is actually something new that needs to be sent to the client. After the server sends a response with some data, the client sends another poll request either immediately or after a delay. That's how the server is actually able to initiate the communication which isn't possible in traditional HTTP protocol.
Long Polling
Both of the above techniques have their own drawbacks which lead to the use of websockets.
Working of Websockets #
Websockets allow the client as well as the server to initiate the sending of messages. The websocket protocol involves a two-part process. The first part involves a handshake and the latter part involves the exchange of data.
WebSocket Illustration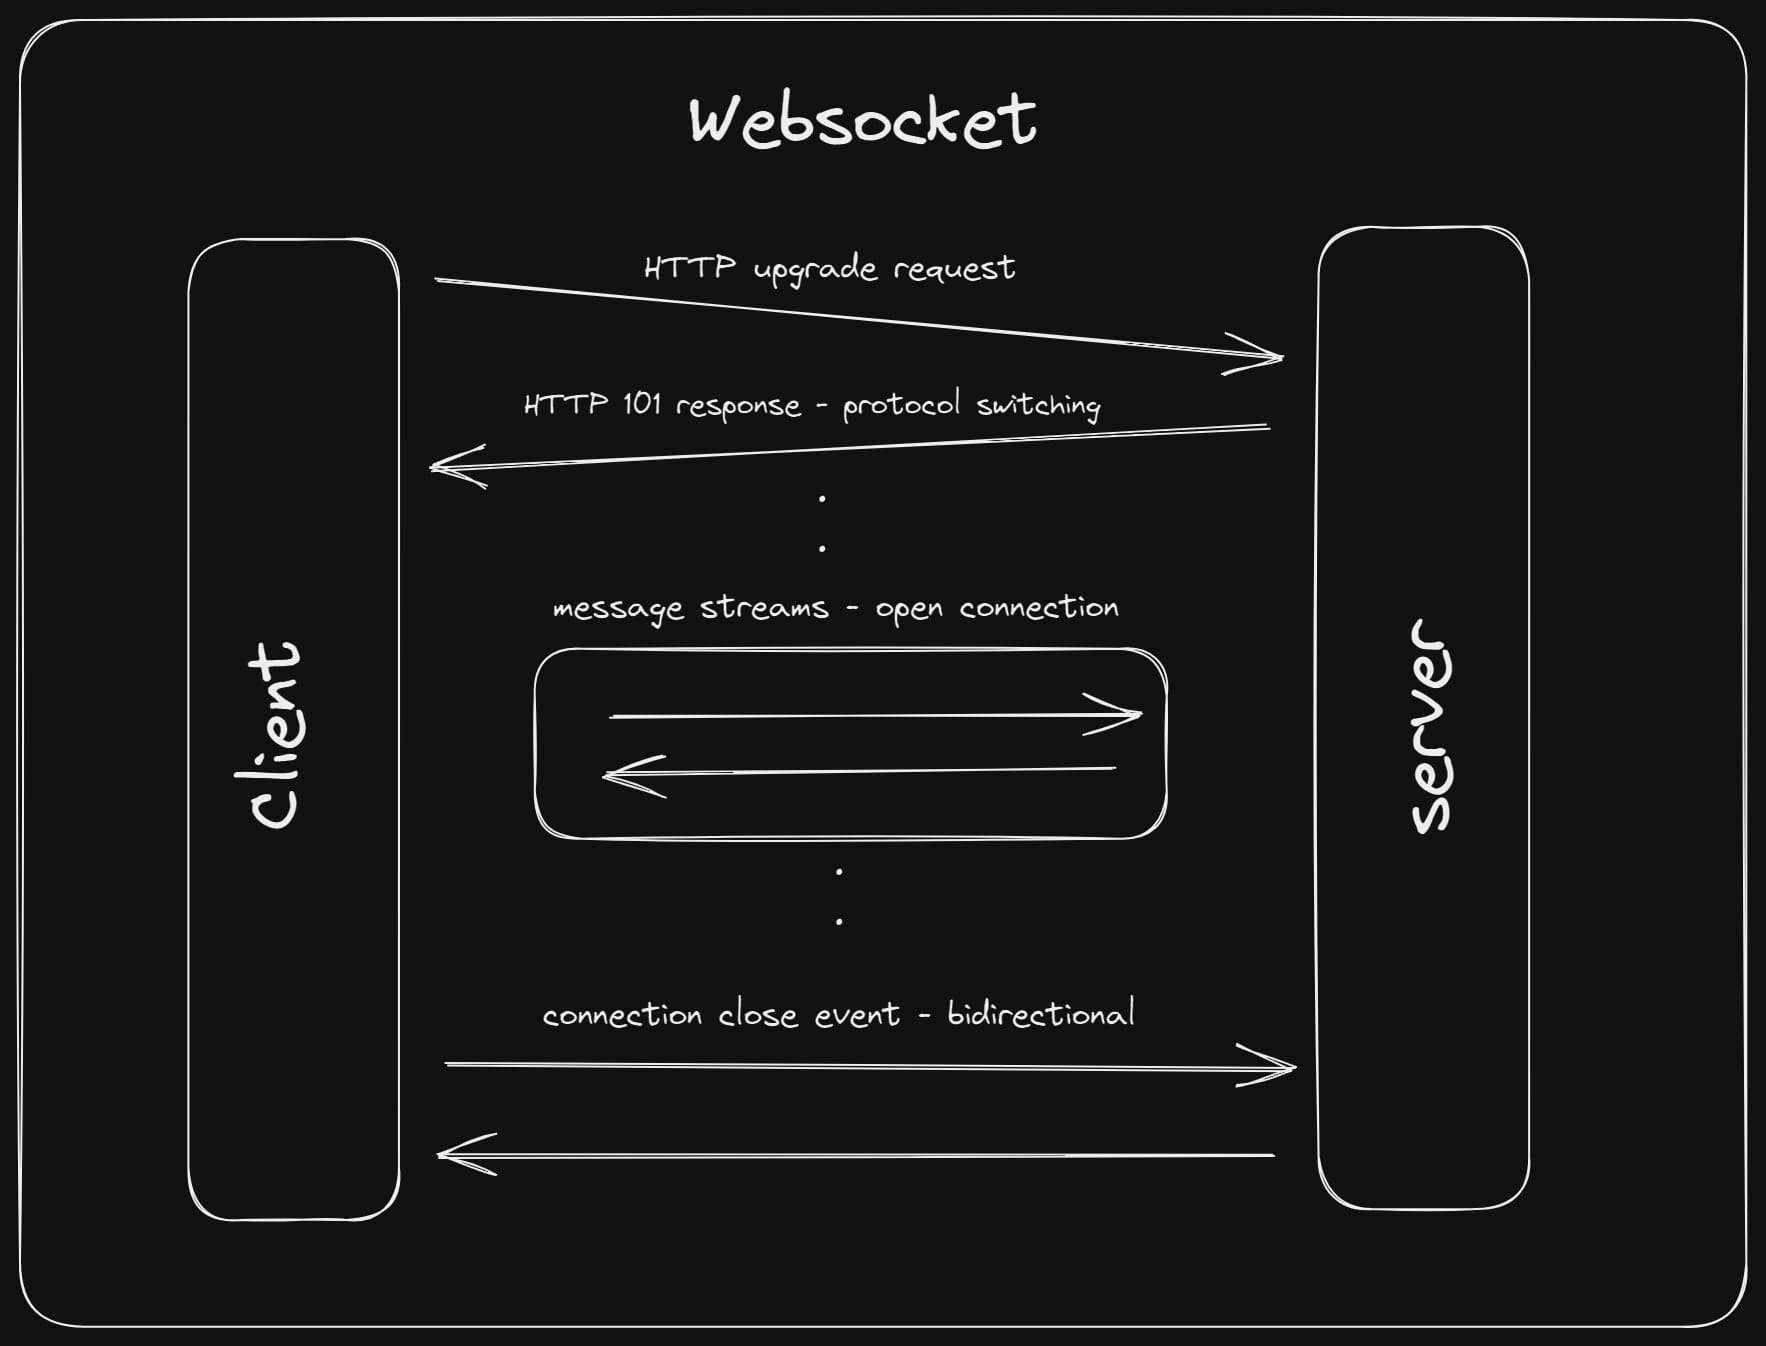
The initial handshake occurs when the client sends an HTTP 1.1 request to the server with an upgrade header set to websocket. This simply means that the client is informing the server that this connection isn't a normal HTTP connection, rather it needs to be upgraded to a websocket connection.
The client's request looks something like this:
GET ws://localhost:5000/ HTTP/1.1
Host: localhost:5000
Connection: Upgrade
Upgrade: websocket
Origin: http://localhost:3000
Sec-WebSocket-Version: 13
Sec-WebSocket-Key: VloOROMIOo0curA7dETByw==
Sec-WebSocket-Extensions: permessage-deflate; client_max_window_bits
The connection type in the above request is set to upgrade and the upgrade protocol is set to websocket. The upgrade header can only be used in HTTP 1.1 requests to upgrade to a different protocol.
The sec-websocket-version, sec-websocket-key, and sec-websocket-extensions are special headers sent by the client to further describe the websocket connection.
Now that the client request is sent, the server will verify the request (to make sure that it's a genuine websocket connection), accept the request if it supports a websocket connection, and return the verification response.
Request verification is done as follows:
- The server needs two pieces of information —
sec-websocket-keyandGUIDto verify the request. - It will then perform necessary operations on this information and derive a
sec-websocket-acceptvalue that is later sent to the client as a response header. This value tells the client that the server has accepted the connection and it can now verify the value.
The sec-websocket-accept header isn't the only thing which is required to know if the server has accepted the connection or not. There's also a status code of 101 which must be present to echo the acceptance of connection by the server. Any status code other than 101 tells that the websocket connection isn't complete.
The server response looks something like this:
HTTP/1.1 101 Switching Protocols
Upgrade: websocket
Connection: Upgrade
Sec-WebSocket-Accept: 30RLwsqJ/mc0ojx6XVmAQTDJSvY=
Now, at this stage, both the client and the server are ready to receive messages from each other.
The websocket instance has access to various events such as onopen, onclose, onmessage, etc. to perform some operations when these events occur.
To better understand the flow of messages and various events, let's build a small application which implements websockets.
Building a Websocket Application #
In order to implement websockets, you can use a nodejs library named ws. It provides a fast and simple way to establish a websocket connection.
WebSocket Server
npm install wsFirstly, you need a server to handle websocket requests. The ws library provides an interface named WebSocketServer to create a websocket server.
// server.mjs
import { WebSocketServer } from "ws"
const wsServer = new WebSocketServer({ port: 5000 })
Then, you can start attaching events to this server.
wsServer.on("connection", (req, ws) => {
    //...
})
The above event will trigger whenever the server receives a new connection request from a client. It provides a callback function with the websocket instance (for a particular client) and the request object.
wsServer.on("connection", (req, ws) => {
    const currentClient = req.headers['sec-websocket-key']
    console.log(`\n\n${currentClient} just got connected\nclients connected: ${wsServer.clients.size}\n`)
})
You can use the request object to the sec-websocket-key header value, which I have used to identify a client. In production you must generate a unique id by yourself. This is just for demonstration purposes. Using the above code, you can log the client connection on the server.
Next, let's see how you can broadcast a message to all clients connected to the server except the current client.
So, here's a function that accepts a message object and broadcasts it to all clients except the one who is sending it.
function broadcast(message) {

    const stringifiedMessage = JSON.stringify(message)

    wsServer.clients.forEach(client => {
        if (client !== ws && client.readyState === WebSocket.OPEN) {
            client.send(stringifiedMessage, (err) => {
                if (err) {
                    console.log(err)
                    return;
                }
            })
        }
    })
}
The websocket server — wsServer, has access to all the clients connected to it. The ws websocket instance itself describes the client. So, you can verify the client against the current ws instance and send the message accordingly.
Also, the message should only be sent if the websocket connection is still open. If a client gets disconnected, the message will not be sent.
But, what if we want to send a message only to the current client? For that, you simply need to do this:
ws.send(message, err => console.log)The error event of the websocket will allow you to log if anything goes wrong.
ws.on("error", console.error)Whenever a client sends a message to the server, the message event will get triggered by which you can broadcast the message to all the clients if you want to.
ws.on('message', (data) => {

    const incomingMessage = data.toString('utf8')

    const outgoingMessage = {
        from: currentClient,
        data: incomingMessage,
        type: {
            isConnectionMessage: false
        }
    }

    broadcast(outgoingMessage)
})
The data you are getting in the message event will be a buffer, so you need to parse it into a string.
You can also broadcast a client disconnected message to all of the connected clients on the event of disconnection of a specific client.
ws.on("close", () => {
    console.log(`\n\n${currentClient} closed the connection\nRemaining clients ${wsServer.clients.size}\n`)

    broadcast({
        from: currentClient,
        data: `${currentClient} just left the chat`,
        type: {
            isConnectionMessage: false,
            isDisconnectionMessage: true
        }
    })
})
WebSocket Client
A websocket client is nothing but a webpage with some client-side javascript. You must use the native WebSocket API provided by the browser to establish a websocket connection.
const ws = new WebSocket("ws://localhost: 5000")The client's ws instance has access to the same events like open, close, message, etc. because it is essentially a websocket connection instance.
ws.onopen = () => { }
ws.onclose = () => { }

ws.onmessage = () => {
    console.log(message)
}

ws.send(message)
Multiple browser instances (or tabs) connected to the same websocket server can serve the purpose of multiple clients.
That's it. You can now send messages to the server and observe how they get broadcasted to multiple connected clients.
Use Cases #
- Real-Time Collaboration
- Chat Applications
- Multiplayer gaming
- Real-Time Feeds
- Live Browser Reloading
Here's the github repository containing the entire code.